Docusar Themes
New modern documentation website themes template for docusaurus project.
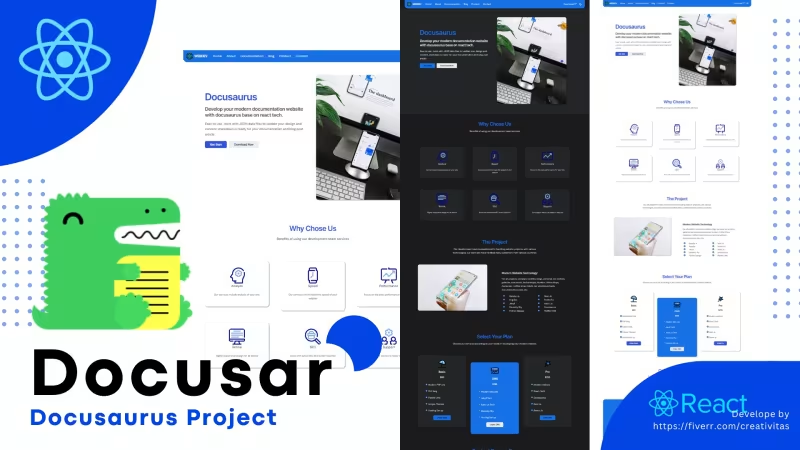
Features
- React Tech
- Js Lang
- Docusaurus
- Documentation Page
- Blog Page
- Contact Page
- Contact Form
- Classic Preset
- Product Services Page
- Home Landing Page
- About Page
- Dark Mode
- Light Mode
- JSON data
- Markdown
- MDX
- Image Cover
- Total 7 Design UI
- Modern Host support netlify vercel cloudflare and others
- Build production host firebase surge and others
Copy URL
Embed Code
How To
1
Download or Order Template
2
Read Documentation Project
3
Run Project on your website
themestemplate website themes website template docs themes docs template react ducosaurus template reactthemes ducosaurusthemes premiumthemes
Docusar Themes Content Docs
Start with Docusa # .
Preparation for using docusar project - new docusaurus themes template.
Node / Yarn Download # .
For first we need third party app for work with docusa project. Download this app
- Node Js Download →
- Optional Download Yarn →
- Doucsa Project
After download third party apps, you can install it on your devices, Open terminal / Command Prompt and check your apps, run this command npm -v for node , or run yarn -v for yarn.
Download Docusa # .
Next step you can download docusa project →
Create Project # .
First we need to create new folder for your project
Add new Project Folder # .
Now you can create project folder you can name it with your project or site. For example we create new project folder on desktop and the folder name is docusa
Extract Docusa # .
Next we need to extract docusa project in to your new project folder. Open doucsa.zip files and extract on your project folder on desktop/docusa
Installation Docusa # .
How to install docusa docusarus themes template project
Access Project # .
Oke now you can open terminal and access in to your project folder. for example we have create new project folder and call it docusa on desktop., so you can run this command.
cd C:\Users\pcname\Desktop\docusa
Change pcname with your devices pc name
Run Installation # .
Now we can run installation with this command
npm install
if you use yarn you can run this command
yarn install
Run Docusa # .
After installation, now we can run doucsa project in to your devices.
Run Project # .
Open terminal and run this command npm start
Next you can open localhost:3000 on your web browser
Github Setup # .
After your project has successfully run on your local devices, so next step we need to create github repo for your documentation site.
Create Github Account # .
Visit on github.com and register for create new account , or you can use your github account.
Next step create new repo for your documentation site project.
Github Repo # .
Now we can create a new repo for your project
Create Repo # .
Login on github with your account, next you can see on header navbar - click on + plus icon and select new repository.
Now you can name it your new repo with your project, and you can choose public if you want everyone to be able to contribute to your documentation project, or you can choose private if you want your project to not use documentation contributions.
Click Add Readme
And push Create Repository button
Clone Repo # .
Now we can clone your github repo in to your local devices.
But for first you need activate personal access token, click on your github profile - Settings - Developer Settings - and create your Personal Access token
Run Clone # .
Open terminal and redirect to your desktop by run this command cd C:\Users\Pcname\Desktop
Next step you can run git clone youraccesstoken/yourgithubname/yourrepo.git
Change youraccesstoken with your github access token , change githubusername with your github name, and change your repo with your repo project name.
Move Project folder # .
Next we can move all your desktop/projectfolder in to your desktop/githubrepoclone folder.
Copy and paste all files.
Folder Structure # .
- blog for write and update your blog post article
- data for update your design and content for static page
- docs for write and update your docuemntation article
- src to configure your theme site and create static pages inside the pages folder
- static for your media storage such as images, etc
docusaurus.config.jsfor configure your site
Site Setup # .
Configuration and setup your documentation website project
Config files # .
To set up your site, you can open the configuration file, open docusaurus.config.js in the root project, and open with a code editor.
SEO Config # .
For first we need to add site title, favicon , tagline and others , for favicon image you can use local storage on static folder or use CDN image.
  title: 'Your site name',
  tagline: 'your tagline in here..',
  favicon: 'url for image favicon',
  url: 'insert your domain name here',
  baseUrl: '/',
  organizationName: 'Your github account',
  projectName: 'Your github repo',
implementation
  title: 'Docusa',
  tagline: 'Docusaurus themes template',
  favicon: 'img/react.svg',
  url: 'https://docusa.pages.dev',
  baseUrl: '/',
  organizationName: 'mesinkasir',
  projectName: 'docusa',
Navigation # .
Next you can change and update header navigation menu on this line code.
  themeConfig:
    ({
      image: 'Image for twitter card and open graph',
      navbar: {
        title: 'Nav title here..',
        logo: {
          alt: 'Alt logo here..',
          src: 'URL Image for your logo..',
        },
        items: [
          { to: 'url Router for your page here..', label: 'Name your Nav Menu', position: 'left' },
          { to: '/', label: 'Home', position: 'left' },
          {type: 'docSidebar',sidebarId: 'tutorialSidebar',position: 'left',label: 'Documentation',},
          {href: 'https://github.com/mesinkasir',label: 'Github',position: 'right',},
        ],
      },
By default, docusaurus uses two navigation sections - left and right, so you can customize the navigation bar menu based on its position. for example left is for left navbar, and right for right navbar.
Implementation for left navbar use position:'left' if you want to use nav menu on right side so you can use this position:'right'
Next you need to know about the use of links or routers, if you want to be linked to your local page for example on a staitc page or a dynamic page such as a blog or document article so you can use to if you want to create an outbound link, so you can use href
Implementation on your local router page to: '/about'
Implementation on your outbound link href: 'https://github.com/mesinkasir'
Implementation complete code look like this
  themeConfig:
    /** @type {import('@docusaurus/preset-classic').ThemeConfig} */
    ({
      image: 'img/docusaurus-social-card.jpg',
      navbar: {
        title: 'DOCUSA',
        logo: {
          alt: 'Modern and New Documentation Website Themes for Ducosarus Project.',
          src: 'img/rea.svg',
        },
        items: [
          { to: '/', label: 'Home', position: 'left' },
          { to: '/about', label: 'About', position: 'left' },
          {type: 'docSidebar',sidebarId: 'tutorialSidebar',position: 'left',label: 'Documentation',},
          { to: '/blog', label: 'Blog', position: 'left' },
          { to: '/product', label: 'Product', position: 'left' },
          { to: '/contact', label: 'Contact', position: 'left' },
          {href: 'https://github.com/mesinkasir',label: 'Github',position: 'right',},
        ],
      },
Footer Menu # .
Now we can scroll on footer menu to setup your footer design UI
    footer: {
        style: 'dark',
        links: [
          {
            title: 'Menu 1 Title here..',
            items: [
              {
                label: 'Title menu 1.1 here..',
                to: 'Router link for menu 1',
              },
              {
                label: 'Title menu 1.2 here..',
                to: 'Router link for menu 2',
              },
            ],
          },
          {
            title: 'Menu 2 Title Here...',
            items: [
              {
                label: 'Title menu 2.1 here..',
                to: 'Router link for menu 1',
              },
              {
                label: 'Title menu 2.2 here..',
                href: 'Outbound link for menu 2',
              },
            ],
          },
          {
            title: 'Add new Menu 3 Title Here...',
            items: [
              {
                label: 'Title menu 3.1 here..',
                to: 'Router link for menu 1',
              },
              {
                label: 'Title menu 3.2 here..',
                href: 'Outbound link for menu 2',
              },
            ],
          },
        ],
        copyright: `Copyrights Footer area in here..`,
      },
Example Implementation
    footer: {
        style: 'dark',
        links: [
          {
            title: 'Docs',
            items: [
              {
                label: 'Tutorial',
                to: '/docs/welcome',
              },
              {
                label: 'Start',
                to: '/docs/getstarted',
              },
            ],
          },
          {
            title: 'Community',
            items: [
              {
                label: 'Stack Overflow',
                href: 'https://stackoverflow.com/questions/tagged/docusaurus',
              },
              {
                label: 'Discord',
                href: 'https://discordapp.com/invite/docusaurus',
              },
              {
                label: 'Twitter',
                href: 'https://twitter.com/docusaurus',
              },
            ],
          },
          {
            title: 'More',
            items: [
              {
                label: 'Blog',
                to: '/blog',
              },
              {
                label: 'GitHub',
                href: 'https://github.com/mesinkasir',
              },
            ],
          },
          {
            title: 'More',
            items: [
              {
                label: 'Blog',
                to: '/blog',
              },
              {
                label: 'GitHub',
                href: 'https://github.com/facebook/docusaurus',
              },
            ],
          },
          {
            title: 'More',
            items: [
              {
                label: 'Contact',
                to: '/contact',
              },
              {
                label: 'Hire Developer',
                href: 'https://fiverr.com/creativitas',
              },
            ],
          },
        ],
        copyright: `Copyright © ${new Date().getFullYear()} My Project, Inc. Built with Docusaurus.`,
      },
You can change it again later after you update and add docs pages, blog pages, and static pages on your site, so you can create navigation menus and direct them to your pages.
Static Page # .
Docusar static page features Docusaurus webite themes
Home Page # .
Update home page design UI and content article page.
Home Page Data # .
Now you can change and update home page design UI or update article content , access on data/Home.json and open with code editor
SEO home page # .
First you can set up SEO for your home page by updating the title and description for your home page.
  "title": "New Docusaurus Themes Template",
  "description": "Docusa is complete set for help you develop modern documentation site - Docusaurus project.",
  "url": "/",
  "image": "img/doc.svg",
Header Area # .
To update your header area, you can access this line of code, and edit to your needs there.
Example
  "header": {
    "title": "Your home page header title here..",
    "description": "Header Description for your home page..",
    "intro_text": "Intro text goes here...",
    "button_1": "Text for button 1 here...",
    "button_1_link": "Routes link goes here...",
    "button_2": "Text for button 2 here...",
    "button_2_link": "Router link for button 2 here...",
    "image": "URL CDN or local image for header here..."
  },
Implementation
  "header": {
    "title": "Docusa",
    "description": "Modern and New Documentation Website Themes for Docusarurs Project.",
    "intro_text": "Easy to use , work with JSON data files to update your design and content, markdown is ready for your documentation and blog post article",
    "button_1": "Get Start",
    "button_1_link": "/docs/welcome",
    "button_2": "Download Now",
    "button_2_link": "/order",
    "image": "img/doc.svg"
  },
Features Area # .
To edit and update feature areas, you can set how many features for your site. to add a new one you can copy and paste the example code, then you can edit it according to your needs.
Media usage - to add your local image so you can upload your image in static/img then you can add your local image by using this url img/myimage.png, if you want you can use CDN image by copying and paste your CDN image URL.
Example code
  "features": {
    "title": "Your title for features area here...",
    "description": "Description for your features area..."
  },
  "feature_list": [
    {
      "icon": "URL or CDN Image for features 1 here...",
      "title": "Title for your features 1 here...",
      "content": "Write your content features here..."
    },
    // for add new you can use this code
    {
      "icon": "URL or CDN image for new features here..",
      "title": "Title for your new features..",
      "content": "Write content for your new features..."
    },
    // example use local image
    {
      "icon": "img/json.svg",
      "title": "JSON",
      "content": "Full JSON data support for ease of customizing your project."
    },
    // example use CDN image
    {
      "icon": "https://res.cloudinary.com/demo/image/upload/c_thumb,g_face,h_200,w_200/r_max/f_auto/woman-blackdress-stairs.png",
      "title": "JSON",
      "content": "Full JSON data support for ease of customizing your project."
    }
  ],
implementation with 6 features list
  "features": {
    "title": "Docusa Features",
    "description": "Cool and complete Docusa themes features for your docusaurus project."
  },
  "feature_list": [
    {
      "icon": "img/react.svg",
      "title": "React",
      "content": "Using React technology, React is a modern and popular website technology."
    },
    {
      "icon": "img/json.svg",
      "title": "JSON",
      "content": "Full JSON data support for ease of customizing your project."
    },
    {
      "icon": "img/markdown.svg",
      "title": "Markdown",
      "content": "MDX support is more flexible for your content, and with markdown - writing becomes faster."
    },
    {
      "icon": "img/design.svg",
      "title": "Design UI",
      "content": "Unique and modern design for an attractive appearance on your site. Supports Dark and Light Mode"
    },
    {
      "icon": "img/widget.svg",
      "title": "WIdget",
      "content": "The widget section structure makes it easy for developers to make quick adjustments."
    },
    {
      "icon": "img/config.svg",
      "title": "Config",
      "content": "Docusaurus' default configuration makes it easy for you to set up your site."
    }
  ],
Section area # .
To update your section area, you can search for this line code, and update according to your needs. to add a new list you simply copy and paste from the example code, then edit it.
  "section": {
    "title": "Why Docusa",
    "description": "Docusa is a multi-purpose docusaurus theme, you can use it for startups, hosting, agencies, apps, developers and more.",
    "image": "img/dev.svg",
    "intro": "It's easy to work with docusa project.",
    "intro_text": "Docusa projects are designed for user convenience, no hardcoding, you only need to work with markdown and JSON files to update or change the design, these are some of the advantages of using Docusa projects.",
    "list": [
      {
        "text": "Static Page"
      },
      {
        "text": "Docs Page"
      },
      {
        "text": "Blog Page"
      },
      {
        "text": "Auto SEO"
      },
      {
        "text": "Dark Mode"
      },
      {
        "text": "Light Mode"
      },
      {
        "text": "Json Data"
      },
      {
        "text": "Markdown"
      },
      {
        "text": "MDX"
      },
      {
        "text": "Others"
      }
    ]
  },
Pricing and Plan area # .
To update your price or plan area, you can search for this line code, then edit according to your needs, to add new text info, you can simply copy the example code, then edit with the text according to your needs.
  "plan": {
    "title": "Select Your Plan",
    "description": "Choose Docusa services according to your needs, for theme creation, docusa projects or custom projects."
  },
  "basic_plan": {
    "title": "Themes",
    "icon": "img/basic.svg",
    "currency": "$",
    "price": "75",
    "link": "/",
    "features": [
      {
        "text": "Docusa theme to help build modern documentation sites, with the docusa theme project for docusaurus."
      },
      {
        "text": "Includes Documentation to help you work with Docusa"
      }
    ]
  },
  "standard_plan": {
    "title": "CMS",
    "icon": "img/standard.svg",
    "currency": "$",
    "price": "80",
    "link": "/",
    "features": [
      {
        "text": "Services for building headless CMS backends for your various modern website projects."
      },
      {
        "text": "Headless CMS For Docusaurus, Gatsby, Next, Jekyll, Astro Js, and others."
      }
    ]
  },
  "pro_plan": {
    "title": "Custom",
    "icon": "img/pro.svg",
    "currency": "$",
    "price": "155",
    "link": "/",
    "features": [
      {
        "text": "Develop your project or create a theme for your website from scratch, or help import your theme into modern website technology."
      },
      {
        "text": "All website technology support"
      }
    ]
  },
Contact Area # .
And the last part of the home page is the contact area, so you can search for this line code, and edit it according to your needs.
  "contact": {
    "title": "Contact Docusa Dev",
    "description": "If you Need Help or Information, you can contact our team developer.",
    "button": "Contact Us",
    "link": "/contact"
  }
}
About Page # .
Update about page design UI and content article page.
About Page Data # .
Now you can change and update home page design UI or update article content , access on data/About.json and open with code editor
SEO for About Page # .
First, you need to set up your SEO, so you can update your title, description, url and cover image here.
Example code
  "title": "About Docusa - New Docusaurus Themes",
  "description": "Docusa is a new documentation website for your docusaurus project - Modern and New Documentation Website Themes for Docusarurs Project.",
  "url": "/about",
  "image": "img/docs.svg",
Header area # .
For the update header area you can find this line code and update it according to your needs.
Implementation
  "header": {
    "title": "About Docusa",
    "description": "Modern and New Documentation Website Themes for Docusarus Project.",
    "image": "img/docs.svg"
  },
Intro area # .
For the update intro area you can find this line code and update it according to your needs.
Implementation
  "intro": {
    "title": "Make it easy with Docusa",
    "description": "Docusa is a project developed to make it easier for users to work, with the various features available making you more comfortable using docuna in developing documentation sites with modern designs.."
  }
Section 1 area # .
For the update section 1 area you can find this line code and update it according to your needs.
Implementation
  "section_1": {
    "title": "JSON data makes everything easy",
    "description": "There's no need to hardcode to update designs or write static page content, this is because Docusa uses JSON to make it easy for you to make changes quickly, and is easy to develop for integration with Headless CMS as your backend.",
    "image": "img/colabs.svg"
  },
Section 2 area # .
For the update section 2 area you can find this line code and update it according to your needs.
Implementation
  "section_2": {
    "title": "Write fast with Markdown or MDX",
    "description": "Using markdown makes writing easier and faster, for updating blog and documentation pages, MDX support makes it easier for you to customize according to your needs. Docusaurus also makes it easy for you to grouping based on your documentation categories, to make it easier for readers or web visitor to get clearer and more complete information on your documentation site.",
    "image": "img/clouddoc.svg"
  },
Section 3 area # .
For the update section 3 area you can find this line code and update it according to your needs.
Implementation
  "section_3": {
    "title": "The React Technology",
    "description": "By default, the Docusa theme is developed in docusaurus, and runs on modern website technology with React. React is a popular frontend that is widely used in the world, this is because React has complete features and good SEO capabilities.",
    "text": "So what are you waiting for?? Get started now with the Docusa theme, to help you develop and build modern website documentation.",
    "image": "img/documentationweb.svg"
  }
Product Page # .
Update Design and Content for Product or Services for your product page area
Product Page Data # .
Now you can change and update home page design UI or update article content , access on data/Product.json and open with code editor
SEO for Product Page # .
First, you need to set up your SEO, so you can update your title, description, url and cover image here.
Example code
  "title": "Docusaurus Web Developer Product and Services",
  "description": "Website developer docusaurus - create themes and web developer services",
  "url": "/product",
  "image": "img/react.svg",
Header area # .
For the update header area you can find this line code and update it according to your needs.
    "title": "Product Services",
    "description": "Docusa Docusarus web developer - Product and Services"
Product or Services # .
Now you can add information about your product or services. to add a new list you simply copy and paste from the example code, then edit it.
Example
  "product_list": [
    {
      "image": "URL image here..",
      "title": "Title for your product services..",
      "content": "Content article for information about your product services list..."
    },
    {
      "image": "URL Image for new product services here...",
      "title": "Title for new product services here...",
      "content": "Write information for new product services here..."
    },
    {
      "image": "img/product/eleventy.svg",
      "title": "Eleventy 11ty Dev",
      "content": "If you want to develop a site with a fast static site generator, then Eleventy 11ty is your solution."
    }
Implementation
  "product_list": [
    {
      "image": "img/product/docsite.svg",
      "title": "Documentation Site",
      "content": "We can help you to create, develop and build documentation websites. - Tech Docusaurus or Starlight by Astro Js"
    },
    {
      "image": "img/product/jekyll.svg",
      "title": "Jekyll Web",
      "content": "If you need a Jekyll website developer, then we are the right choice for your Jekyll project."
    },
    {
      "image": "img/product/eleventy.svg",
      "title": "Eleventy 11ty Dev",
      "content": "If you want to develop a site with a fast static site generator, then Eleventy 11ty is your solution."
    }
Contact Page # .
Update Design and Article for contact page.
Contact Page Data # .
Now you can change and update home page design UI or update article content , access on data/Contact.json and open with code editor
SEO for Contact Page # .
First, you need to set up your SEO, so you can update your title, description, url and cover image here.
Example code
  "title": "Hire Docusaurus Web Developer",
  "description": "Contact Website developer docusaurus - modern documentation site themes template",
  "url": "/contact",
  "email_id": "Your endpoint email id",
  "image": "img/contact.svg",
To set an email id, you can go to our Gumroad docs documentation.
Header area # .
For the update header area you can find this line code and update it according to your needs.
    "title": "Contact Docusa",
    "description": "If you need help and information, or you have docusaurus project , you can contact our team dev"
Contact Info # .
Now you can add information about your contact. to add a new list you simply copy and paste from the example code, then edit it.
Example
  "contact_info": [
    {
      "title": "Your contact info 1",
      "content": "Your contact info text 1"
    },
    // implementation look like this
    {
      "title": "Phone",
      "content": "+6287819355589"
    },
    // for add new contact info list
    {
      "title": "new contact info title",
      "content": "Nex contact info content"
    }
Implementation
  "contact_info": [
    {
      "title": "Showroom",
      "content": "Hollywood , San Angola - Delajabu - USS"
    },
    {
      "title": "Phone",
      "content": "+6287819355589"
    },
    {
      "title": "Whatsapp",
      "content": "+62895339403223"
    },
    {
      "title": "Email",
      "content": "[email protected]"
    }
Markdown Page # .
You can create new page by add new markdown files
Folder location # .
For create new article markdown static page you can open on src/pages
Create markdown article # .
next you can create new markdown file name it with your page, for example whychoseus.md
Add this frontmatter concept
---
title: Hey Markdown Page in here
description: This description about your markdown files..
image: img/docusaurus.png
---

write your markdown article in here...
Update markdown article # .
If you want to edit a Markdown static page, you can open in src/pages and select your article, then open with your code editor and edit it.
Delete markdown article # .
For delete markdown article page, you can simply just delete .md files.
Documentation Page # .
Documentation page Docusa dynamic page features Docusaurus webite themes
New Group Docs # .
How to create new group categories for your documentation page
Create new Group Docs # .
First you can access the docs folder, create a new folder and rename it to your documentation category - for example get-start
Setup Group Docs # .
open get-start folder and create new json files, name it with _category_.json
Now open on _category_.json with code editor and insert this code
{
  "label": "Your doc title here...",
  "position": 2, //insert number position here..
  "link": {
    "type": "generated-index", // no need to change
    "description": "Write description about your docs group categories here..."
  }
}
implementation
{
  "label": "Getting Started",
  "position": 2,
  "link": {
    "type": "generated-index",
    "description": "How to work with docusa docusaurus project  "
  }
}
Next if you want to add a new group or document category, you can follow the same steps - don't forget to set up categories position.
Category positions will be displayed on the sidebar documentation page.
New Article Docs # .
Create new article documentation page
Create New Docs Article # .
For create new article docs, you can access on docs/yourgroupdocfolder for example you have group categories docs get-start , so you can open docs/get-start folder.
Now you can create new markdown files and name it with your url link for documentation article - for example how-to-install.md
Docs Frontmatter # .
Next, you can add this frontmatter on ho-tow-install.md files
code
---
title: Your Article title docs here...
description: Your description about article docs here...
image: insert url link image for article docs page cover...
sidebar_position: Insert position number for your article on sidebar here...
---

Write your article docs with markdown here....
implementation
---
title: Installation
description: How to install docusa docusarus themes template project
image: img/docusaurus.png
sidebar_position: 3
---

# Installation Docusa

How to install docusa docusarus themes template project

## Access Project

Oke now you can open terminal and access in to your project folder. for example we have create new project folder and call it `docusa` on desktop., so you can run this command.

`cd C:\Users\pcname\Desktop\docusa`

Change pcname with your devices pc name

## Run Installation

Now we can run installation with this command

`npm install`

if you use yarn you can run this command

`yarn install`
Update Article Docs # .
How to update edit and delete documentation article page
Edit Article Docs # .
To edit or update a documentation article, you need to open the group documentation folder, then open with the code editor where your article needs to be edited.
Delete Article Docs # .
To delete a documentation article, you need to open the group documentation folder, then select where your article needs to be delete,and delete article.md files.
Blog Page # .
Blog article page Docusa dynamic page features Docusaurus webite themes
Setup Blogs # .
Setup your blog article page
Add Authors # .
First, you can set up your author blog posts, open it in blog/authors.yml with a code editor, and you can add your authors here.
YAML Code
authorname:
  name: Your Author Name here...
  title: Your author title here....
  url: URL web or social media author profile here...
  image_url: URL or CDN image author here....
Implementation
creativitas:
  name: Creativitas
  title: Creativitas Web developer on Fiverr
  url: https://fiverr.com/creativitas
  image_url: https://fiverr-res.cloudinary.com/t_profile_thumb,q_auto,f_auto/attachments/profile/photo/da7c6d5b192357bd12d1a06a2d45666d-1696045060891/55532de8-4a18-4c26-a84c-097ca440f3e3.jpg
Add New Authors # .
To add a new author you can follow the front matter example
Example
authorname:
  name: Your Author Name here...
  title: Your author title here....
  url: URL web or social media author profile here...
  image_url: URL or CDN image author here....

newauthorname:
  name: Your New Author Name here...
  title: Your New author title here....
  url: URL web or social media new author profile here...
  image_url: URL or CDN image for new author here....
How to Add New Post # .
How Create new article for your blog page
New Article # .
For create new article you can open on blog folder, and create new markdown file, name it markdown file with this format year-month-date-your-url-link for example 2024-02-28-myfirstpost.md then open with code editor and write markdown for your new article post.
Blog Frontmatter # .
Slug is for your url , title is for blog title, authors is for your author - you can add new author on authors.yml , tags is for your tags.
Example
---
slug: url-link-blog
title: Your Blog title
description: Your blog description
authors: insert your authors - check on authors.yml
tags: [your blog tag 1, your blog tag 2]
---

Write markdown post here...
Implementation
---
slug: first-blog-post
title: First Blog Post
authors: creativitas
tags: [hola, docusaurus]
---

Lorem ipsum dolor sit amet, consectetur adipiscing elit. Pellentesque elementum dignissim ultricies. Fusce rhoncus ipsum tempor eros aliquam consequat. Lorem ipsum dolor sit amet
Update Article Blog # .
How to update edit and delete blog article page
Edit Article Blog # .
To edit or update a blog article, you need to open the blog folder, then open with the code editor where your article needs to be edited.
Delete Article Docs # .
To delete a blog article, you need to open the blog folder, then select where your article needs to be delete,and delete article.md files.
Update Config # .
Update Configuration and setup your documentation website project
Update Config files # .
After we have create all static page , add article for documentation , add article for blogpage, now we need to update set up your site, you can open the configuration file, open docusaurus.config.js in the root project, and open with a code editor.
And update navigation, footer menus and more according to your needs.
Github Push # .
Push your final project to the github repo
Push Project # .
Now open terminal and access your clone git project from your github repo before.
Next you can run push github command
Example
git add .
git commit -m "first commit for my docusaurus website"
git push https://[email protected]/username/yourrepo.git
Change username with your github username ,and change your-repo-name with your github repo, and change yourtoken with your github token
Hosting Deploy # .
Run and publish make your website live on modern hosting
For deploy and make your website live, so you need to register on modern static host provider, for example, cloudflare , netlify or vercel.
Register with your github account
Next you can click create new project app for netlify and vercel or pages for cloudflare
And you can click select and integration with your github repo project.
After you have integration with your github account, now you can select yout github repo
Next you can click deploy, and select docusaurus as framework.
Click Deploy
Congratulations your website is live now !!
Healdess CMS # .
Work with modern content management system for your docusaurus project.
If you want to work with CMS , so you can use headless git cms for best solutions.
Same like other cms, with headless cms we can update website and blog quickly.
Include with credential security for login on backend admin, make your website secure.
We can use netlify decap cms for cloud cms or use tina cms for your local dev mode.
With CMS integration, it makes it easier for you to update quickly without needing coding.
Order for custom documentation site docusaurus astro starlight project
Dark react complete collection blog website themes template
UPDATE NEW THEMES TEMPLATE
Select your favorite technology and website blog themes template


