Tailwind CMS
Modern fast website with tailwind cms project - clean minimalist design UI.
How To
1
Download or Order Template
2
Read Documentation Project
3
Run Project on your website
themestemplate website themes website template blog themes blog template template blog cms backend frontend tailwind tailwind blog tailwind cms flatfile cms bludit bluditthemes premiumthemes
Tailwind CMS Content Docs
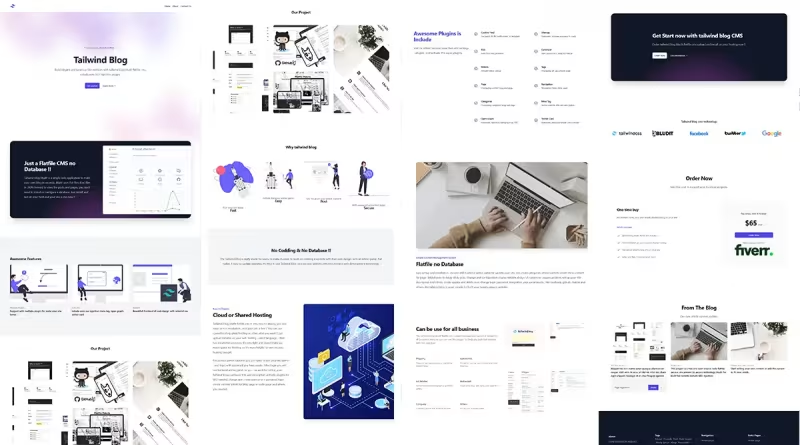
Just a Flatfile CMS no Database !! # .
Tailwind blog Bludit is a simple web application to make your own blog in seconds, Bludit uses flat-files (text files in JSON format) to store the posts and pages, you don't need to install or configure a database. Just install and run on your host and your site is live now !!
Awesome Features # .
- Multiple Plugins - Support with multiple plugin for make your site better.
- Auto SEO - Include auto seo injection meta tag, open graph, twitter card.
- Tailwind - Beautifull frontend UI web design with taliwind css.
No Codding & No Database !! The Tailwind blog is really made for users, to make it easier to work on creating a website with their own design, with an admin panel that makes it easy to update websites. It's time to use Tailwind blog cms for your website with new modern web development technology.
Easy to Deploy Cloud or Shared Hosting Tailwind blog bludit flatfile cms is very easy to deploy, you just need to run installation , and your site is live !! You can use cpanel hosting, plesk hosting or other what you want !! just upload installer on your web hosting , select language - then run installation progress. It's very light and doesn't take up much space for hosting, so it's more helpful to save on your hosting budget. For accsess admin backend you just need to visit yoursite/admin , and login with password you have create. After login you will see backend admin panel, so you can work for settup your tailwind blog, configure title and description ,activate plugins for SEO needed, change and create username + password login , create content article for blog page or static page and others you needed.
How to install # .
- Download full source code project
- Upload on your hosting
- Visit your site and run installation
- By default user is admin - but you can change it later.
- Insert password - click install and BOOM !! Your site is live.
Login # .
For login on backend admin , you can visit on yourwebsite.com/admin
Insert user name by default is admin, and input your password from first installer.
And you can access dashboard admin tailwind blog.
Users # .
For security reason you can access on user menu on sidebar, then create new user, and select position as admin , input password. and save it. After that you can delete your admin user, and now , your website will use new user account you have create.
Configuration # .
OK, now we need to settup and conifgure your website, visit on settings - general sidebar menu.
Insert your title , description and slogan.
After that you can change tab menu for update and settup your website and don't forget to upload your logo. click on logo tab, and upload your logo in here.
Now we need to create custom field , for customises themes to be landing page. Read on documentation how to use custom field.
Plugins # .
you can activate this plugins :
- SITEMAP
- RSS
- TWITTER CARD
- OPEN GRAPH
Content & Categories # .
And now you are ready to write content article, but for first we need to create categories for grouping your article, so click on manage - categories and create new or edit categories in here.
For create content article you can click on + New Content and write article in here. insert title and write content.
Then you can click options button on article form - general and insert description , upload your cover image and select group categories for your article.
Now click on advanced tab - and insert tag for your content article post, and you can select type default is for post blog, static is for page, and sticky is use for your home page design with landing page, so for first you need to create content article with type sticky , then you can click on custom tabs for design your landing page tailwind blog cms.
Click on custom tab and insert all in here like text and url image for design your landing page for home page area. Don't forget to save it for update your site.
You can build many landing page with this project, or you can create blog format with landing page, by settup your one post to be sticky post. and then you can use custom tab for design your home page, area.
For blog post , you can leave custom tab, because custom tab features is use for landing page design. so if you want write blog post, you can leave empty on custom tab.

Super Mario Bros Website Blog Themes
UPDATE NEW THEMES TEMPLATE
Select your favorite technology and website blog themes template


